![]() Last year we built a workshop/shed/depot. Since I planned to build a lot of
stuff (in wood) I decided to buy a table saw. My criteria was that it should be
portable and rather easy to put aside when not in use. I'm new to woodworking so
I didn't have any experience and therefore it was a bit hard to know exactly
what to look for when buying a table saw. After looking around a little bit my
choice fell on the table saw from AEG called AEG TS 250 K.
This was a chance I took, since I couldn't really find any good review for this
table saw on the net. The table saw itself comes with foldable stand, a 254mm
saw blade which is capable of cutting 90mm in 90 degree cuts and 62 mm at 45
degree cuts. It has soft start and the fence looked quite good. So on paper this
seems like a quite good table ... and it is, but there are some quirks.
Last year we built a workshop/shed/depot. Since I planned to build a lot of
stuff (in wood) I decided to buy a table saw. My criteria was that it should be
portable and rather easy to put aside when not in use. I'm new to woodworking so
I didn't have any experience and therefore it was a bit hard to know exactly
what to look for when buying a table saw. After looking around a little bit my
choice fell on the table saw from AEG called AEG TS 250 K.
This was a chance I took, since I couldn't really find any good review for this
table saw on the net. The table saw itself comes with foldable stand, a 254mm
saw blade which is capable of cutting 90mm in 90 degree cuts and 62 mm at 45
degree cuts. It has soft start and the fence looked quite good. So on paper this
seems like a quite good table ... and it is, but there are some quirks.
The last couple of months I've read an endless amount of woodworking pages on the net and I've also watched a substantial amount of woodworking clips on YouTube, so by now I think I have a pretty good understanding of cross cut sleds, router fences, drill press tables, cyclone dust collectors etc, you name it! Quite early on I realized that a cross cut sled would be quite useful. With a cross cut sled you can get very accurate 90 degree cuts, you can easily incorporate stop blocks etc and due to this I could most likely also put my miter saw somewhere so it doesn't occupy my valuable space in the workshop. Ideally I'd like to have all tools ready to be used, but I simply don't have that much space. Anyhow, cross cut sled is a key thing to make.
Ingredients for a cross cut sled
- 12-18mm thick plywood, MDF or something similar that is hard enough to use for the sled base.
- Sled runners made from hardwood (oak, maple, beech etc).
- And some straight pieces of wood for the front and back fence.
- Preferable a routed slot for mounting a t-slot on the back fence.
In principle that's it, sounds simple? It is quite simple, or I should say, it should be quite simple.
Cutting the sled base
Since it's a bit messy in the workshop right now and my plywood sheet was full
size (2450 x 1200mm) I had to use another saw, my track saw, that is a cheap
copy of Festools' TS 55 REQ Track Saw.
It did a good job, so here I didn't really use the AEG table saw. In any case
even if you have the space to handle a full sheet of plywood I think it's pretty
hard to maneuver such a big piece on a table saw that small.
Cutting the sled runners
The sled runners are the strips of hardwood (preferable) that you put in the slots in the table saw base. I.e, these are the ones that guides the sled base when moving it back and forth when cutting your wood pieces.
Problem 1 - no standard miter slots!
The miter gauge slots on AES TS 250 K are no standard slots! They are almost 19mm wide, but only 6mm deep. What makes this even worse is that the slots themselves are not really squared. In the bottom, in the middle of the slot, there is a stripe that is very thin, but still big enough that it makes the slot non-flat. I guess the intention is to take care of the tiny dust that falls into the slots that in some cases prevents miter gauges etc so slide easily.
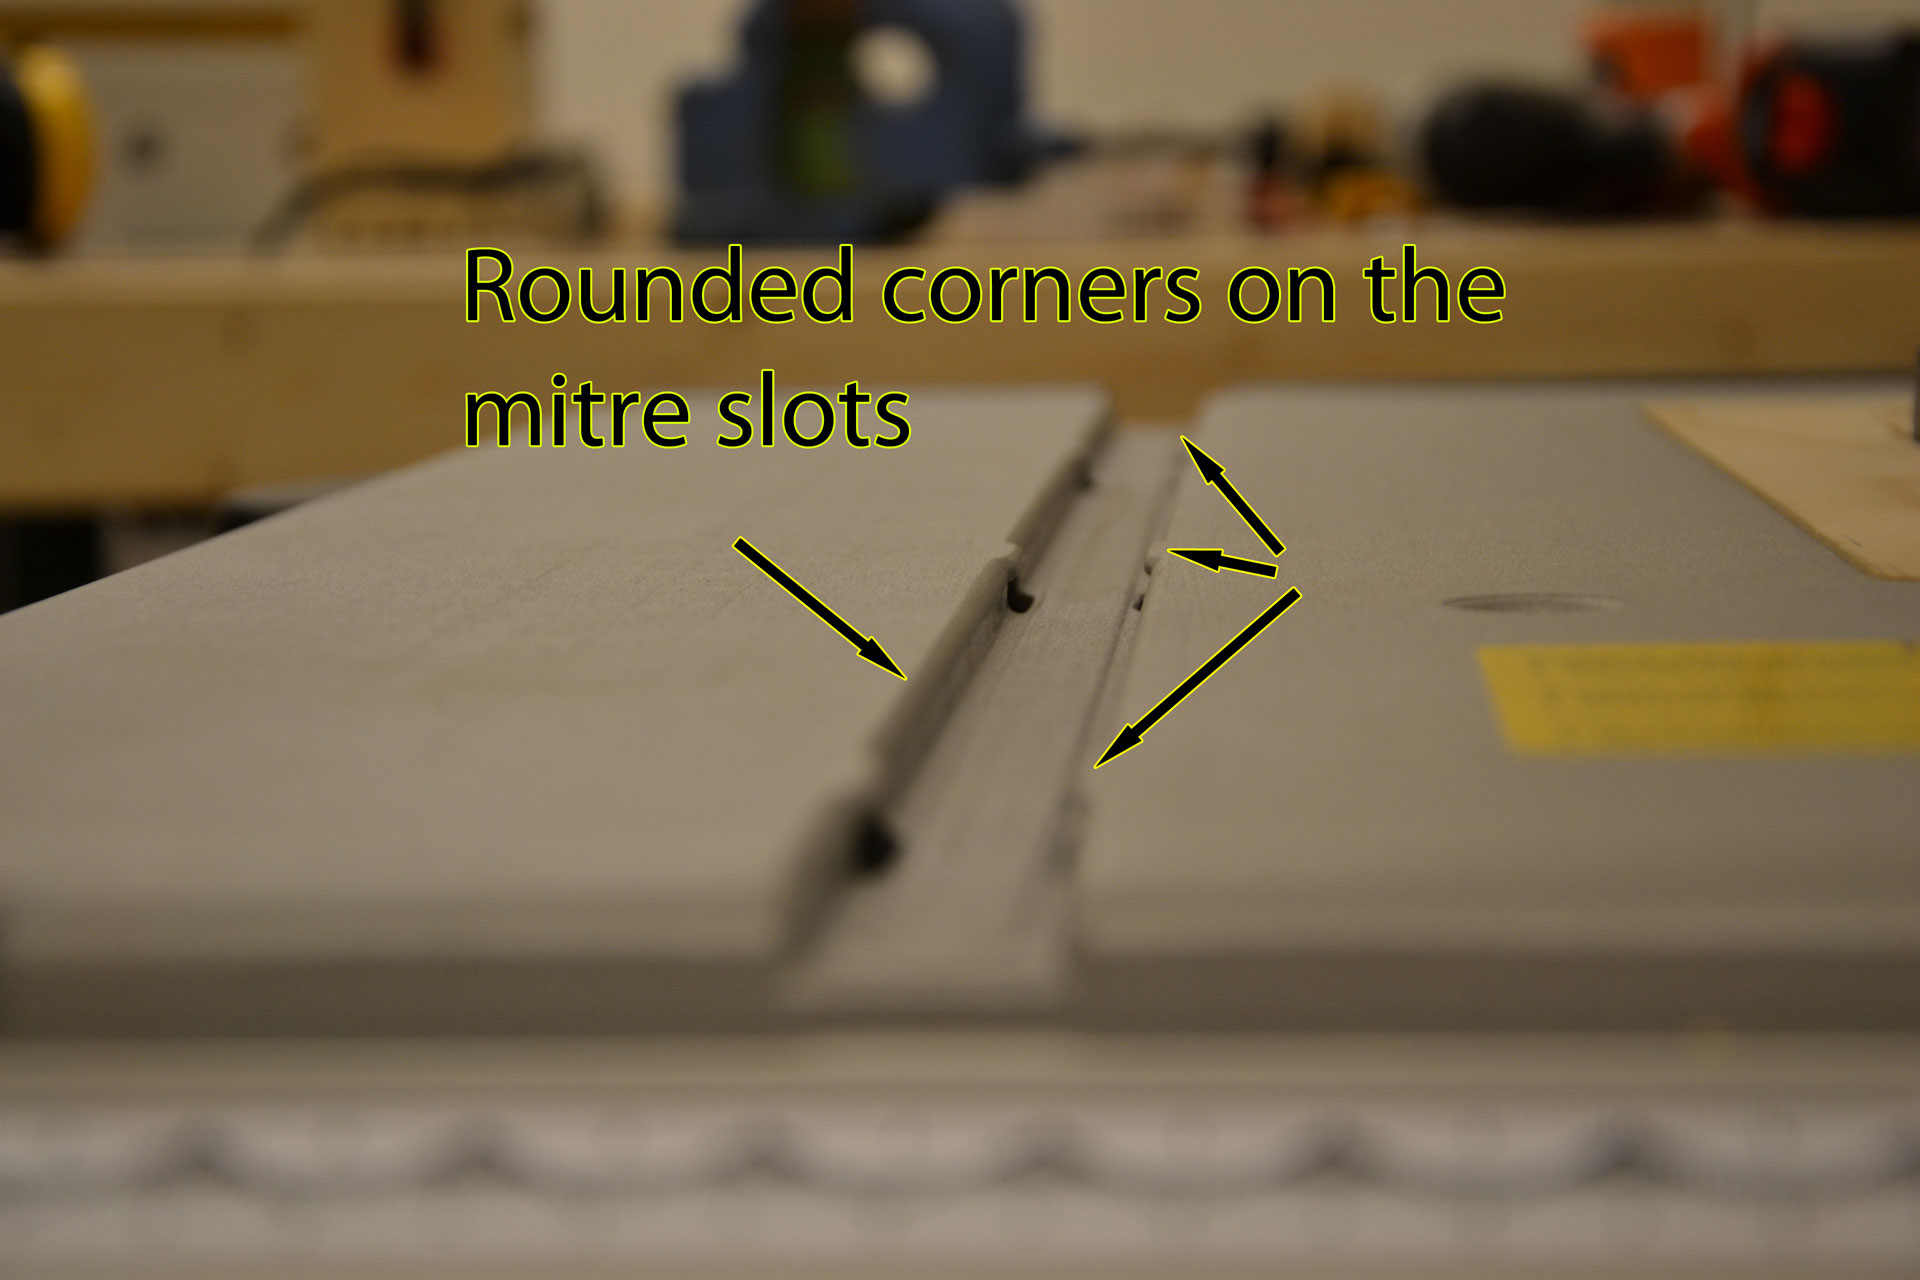
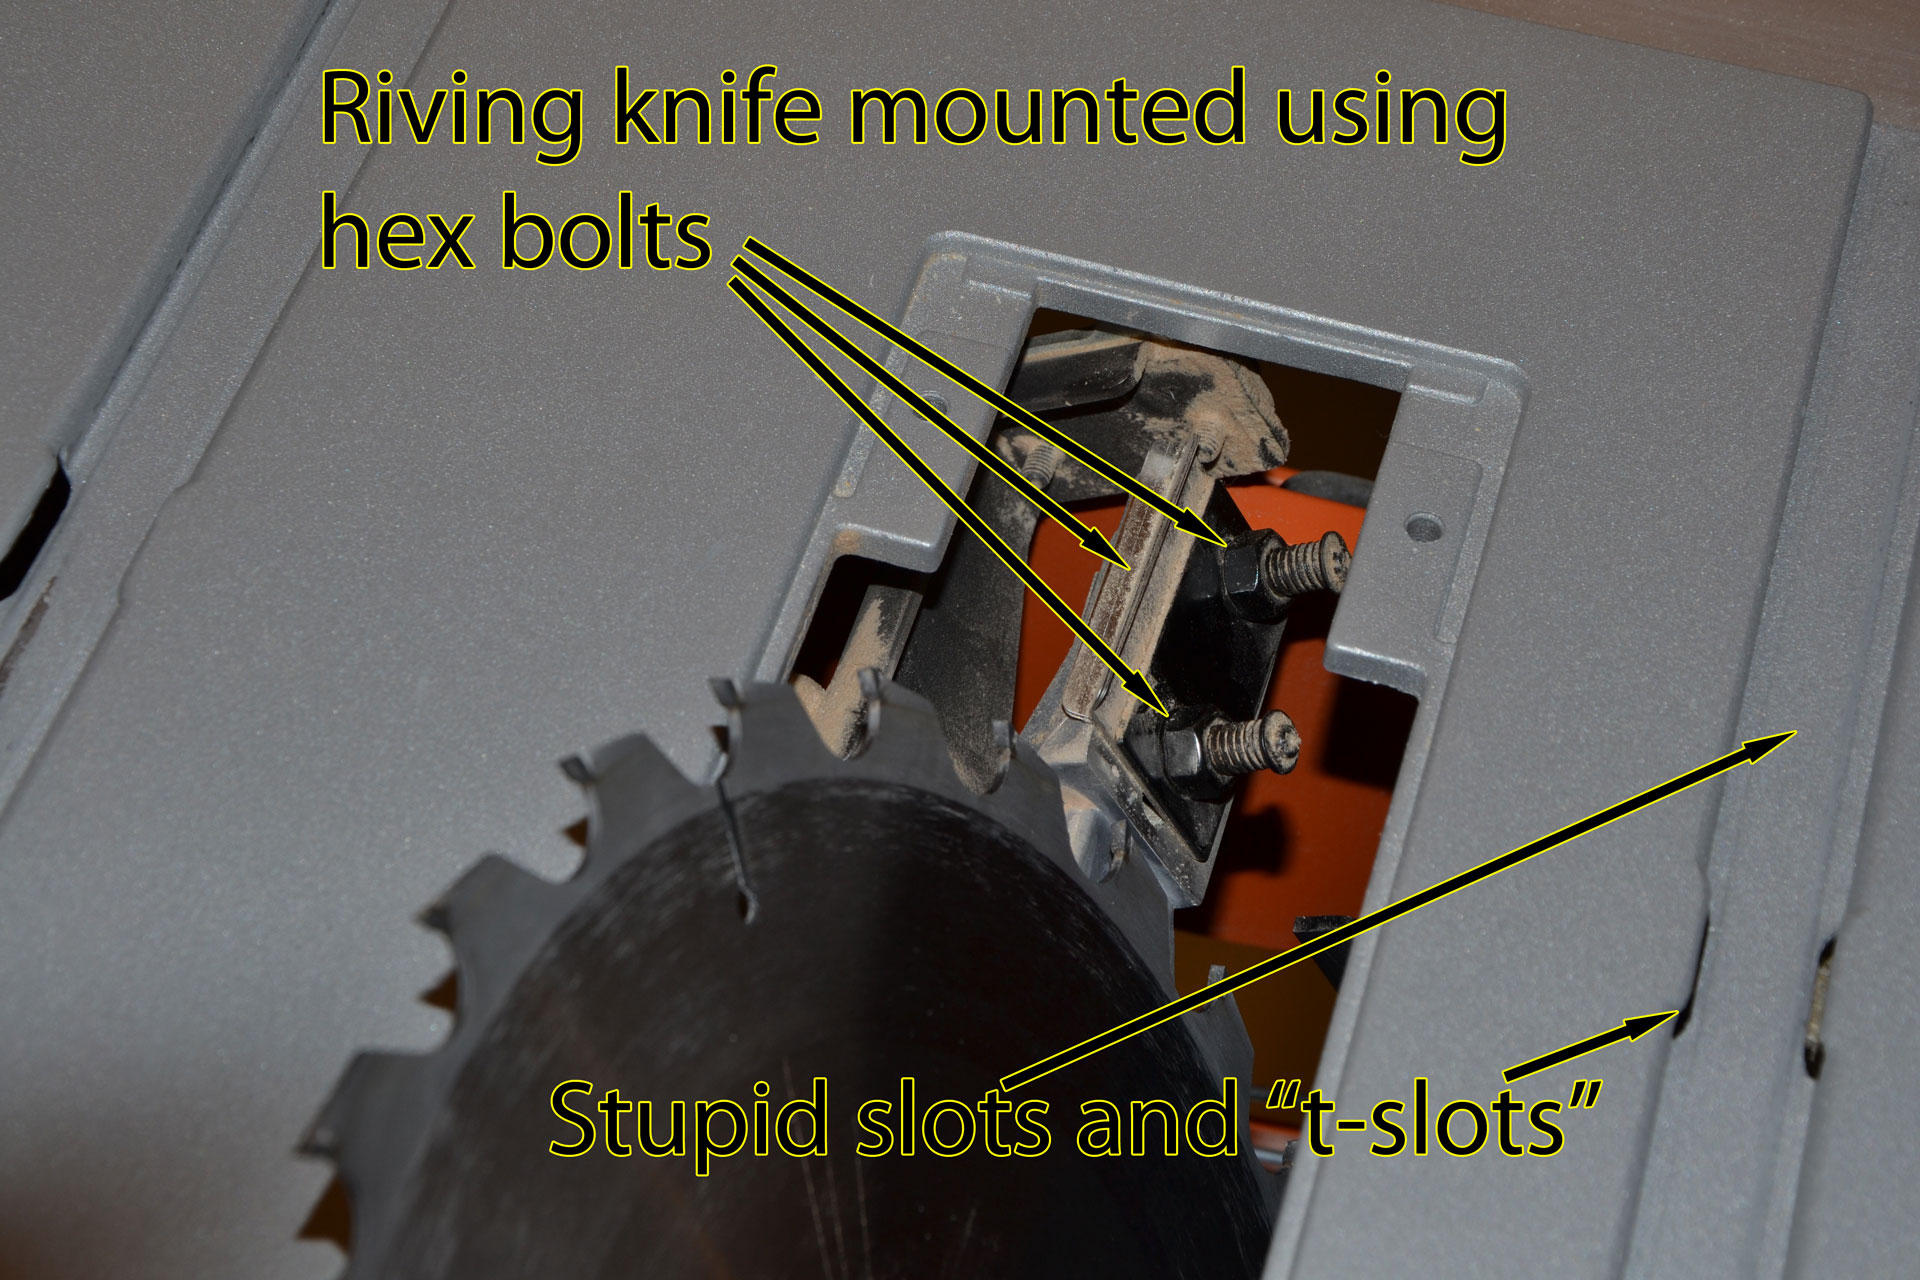
Also at the top, the last 1-2mm of the slot are rounded, which effectively means that you only have straight side "walls" in the slot that are about 4mm. So, you don't have much material in the slot when you want to tighten sled runners. On top of this bad design choice, AEG decided to make three tabs, which I call "inverted t-slots" see the image above and below and you will understand what I'm talking about.
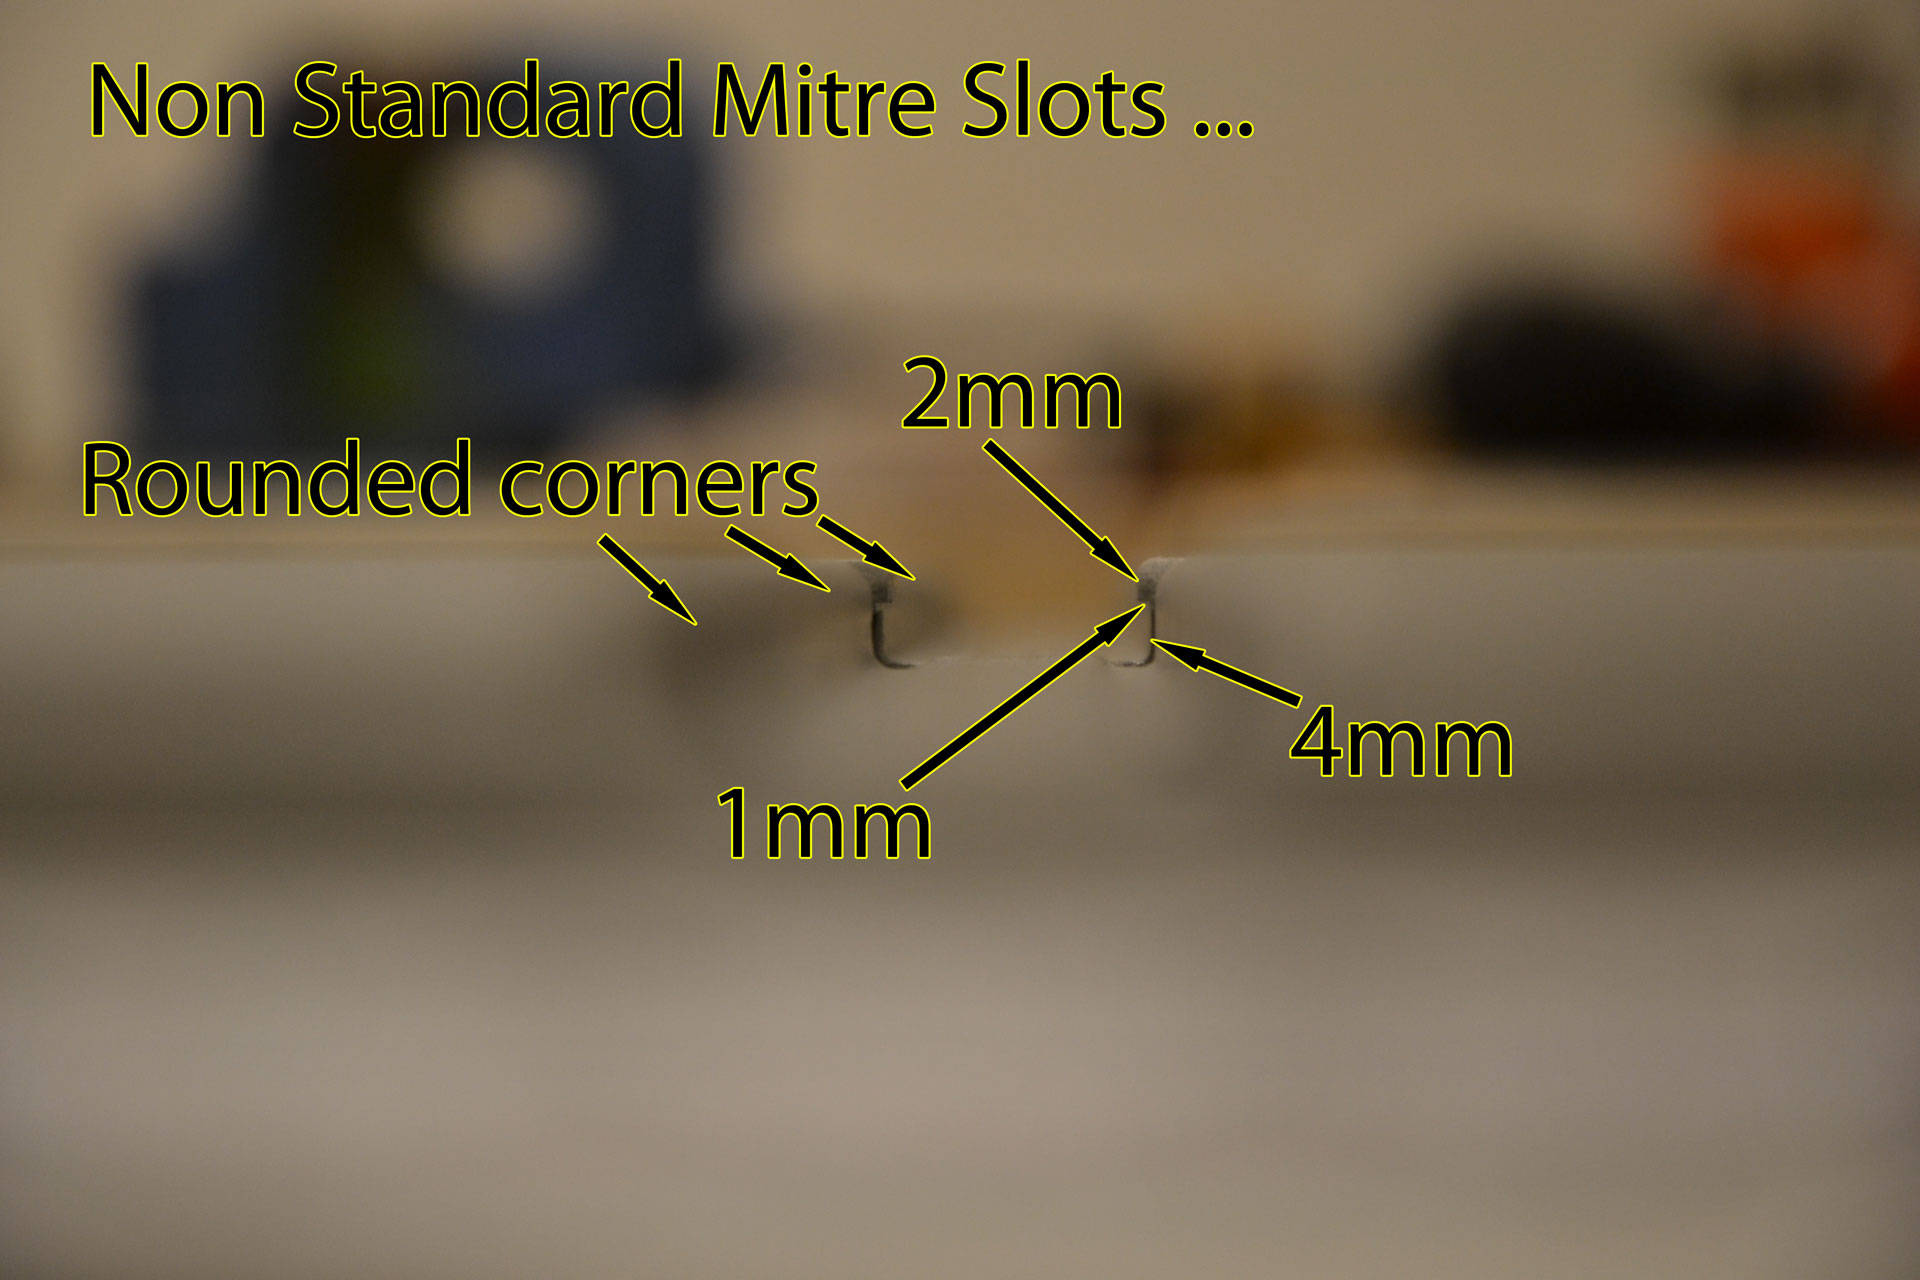
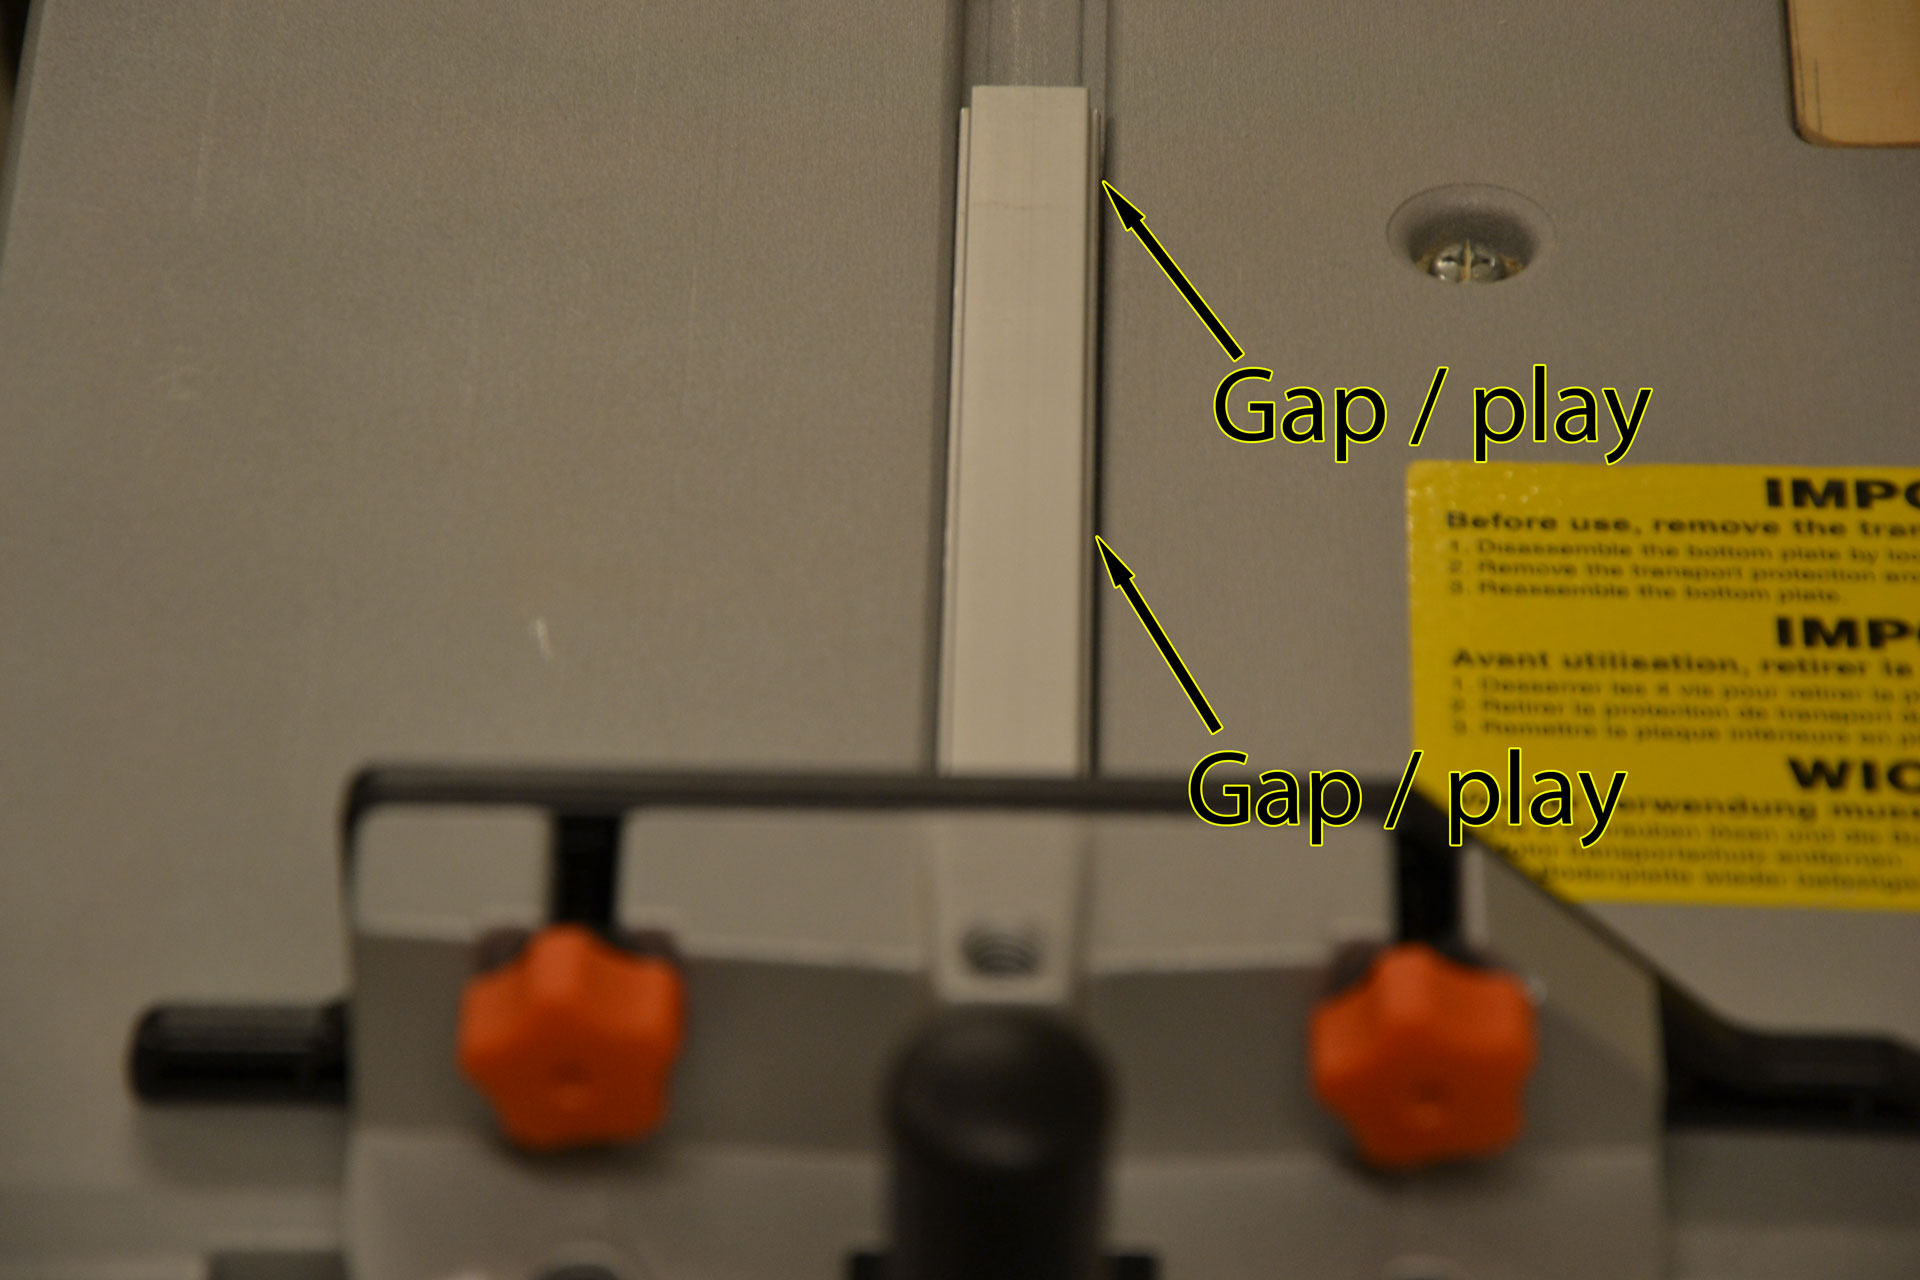
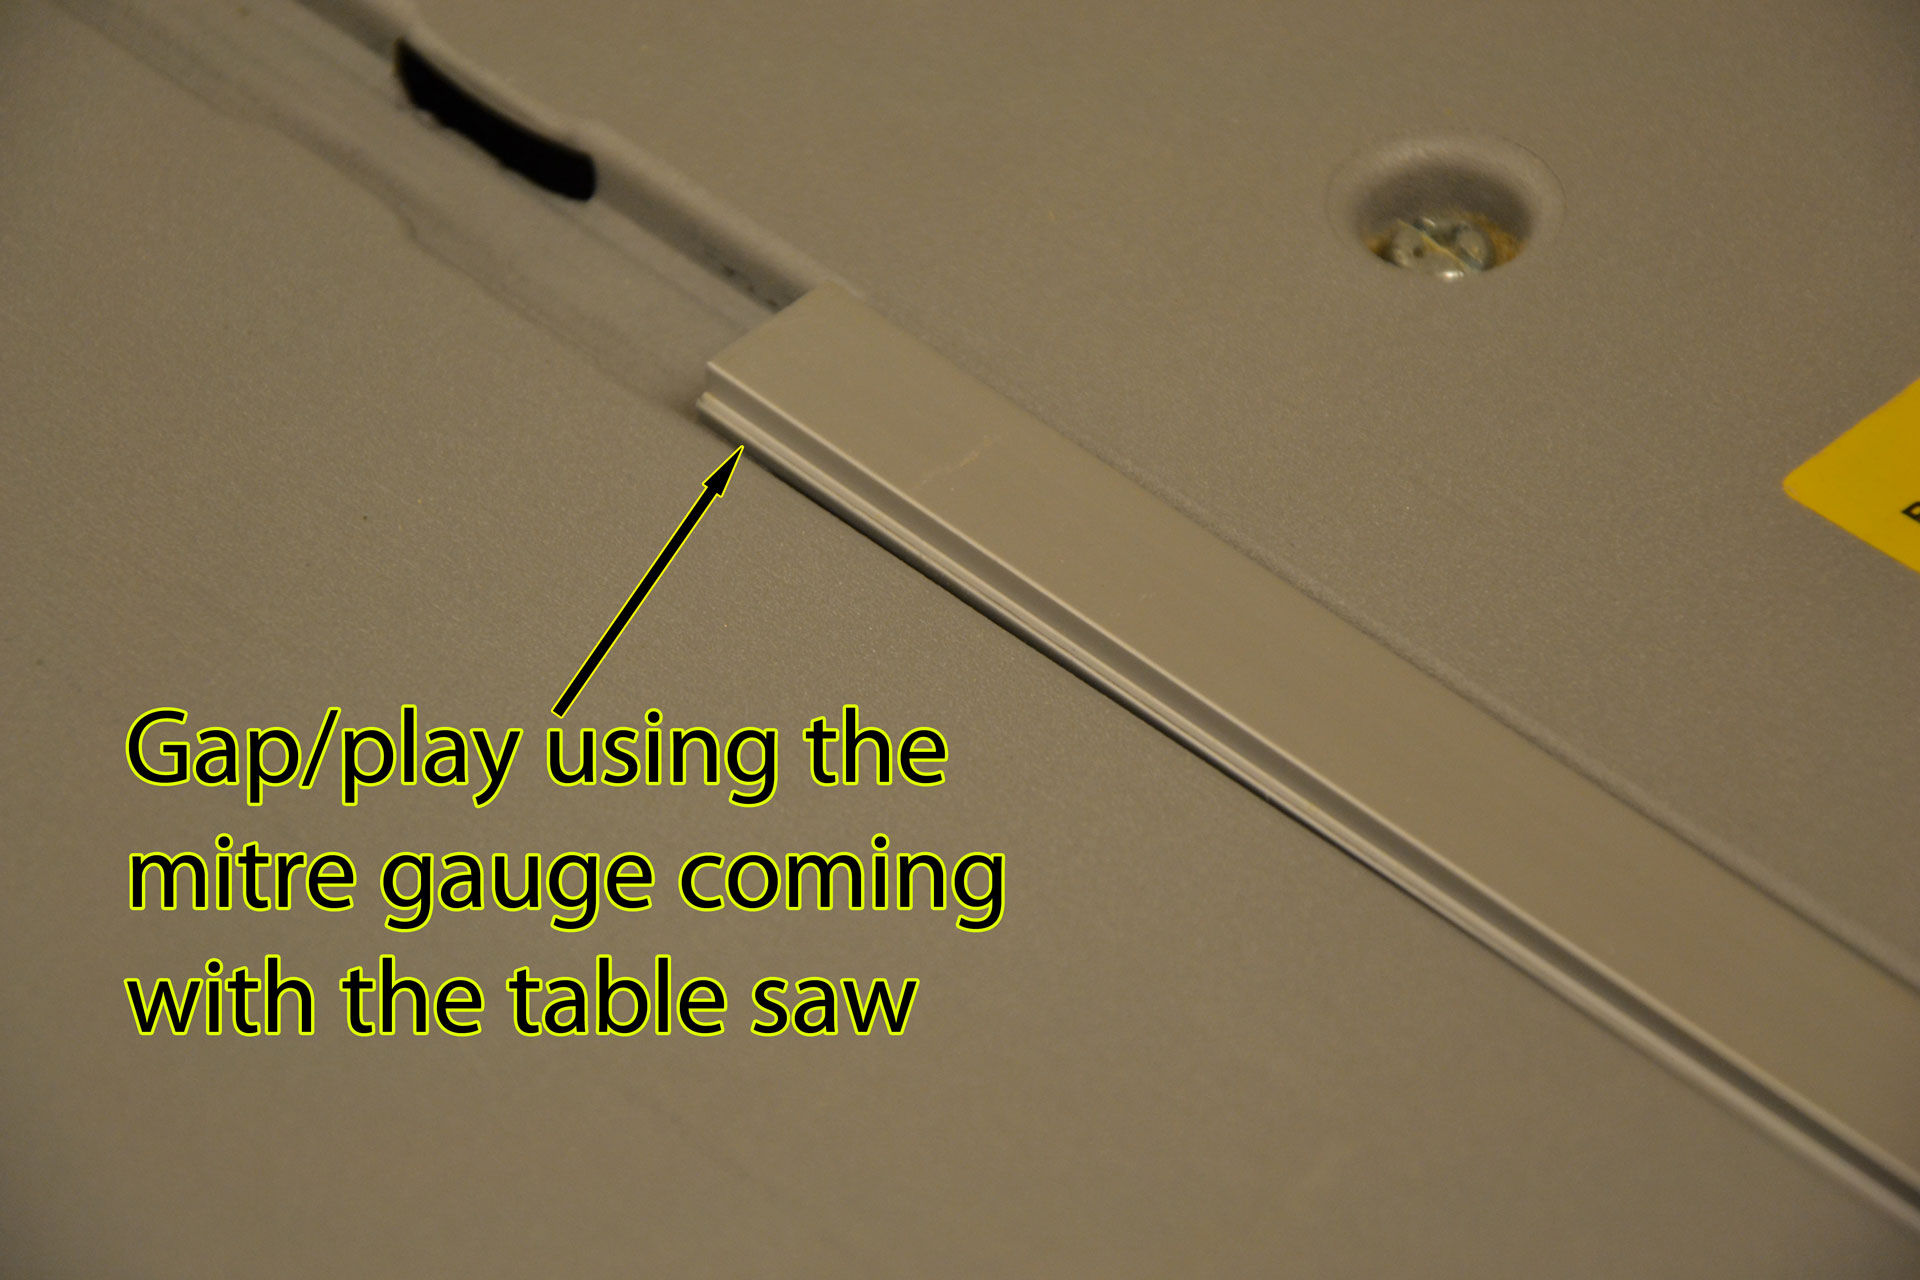
The idea behind this "genius" design is to support the included miter gauge, which by the way is a piece of crap. There is at least 1mm play when using the included miter gauge in the slots, which means that it is totally impossible to get accurate cuts using this gauge regardless how you try to adjust it. The height of the inverted t-slots are roughly 2-3mm, which leads to you only have 3-4mm between them and the bottom of the miter slot.
Anyhow, I have also been able to make a quite good router table with a router fence and micro adjustment capabilities for my router, which means that in theory, I should be able to route 1mm wide and 3mm deep slots on the side of my sled runners. But first I needed to do a rough cut of my oak piece that I intended to use as sled runners in my miter slots.
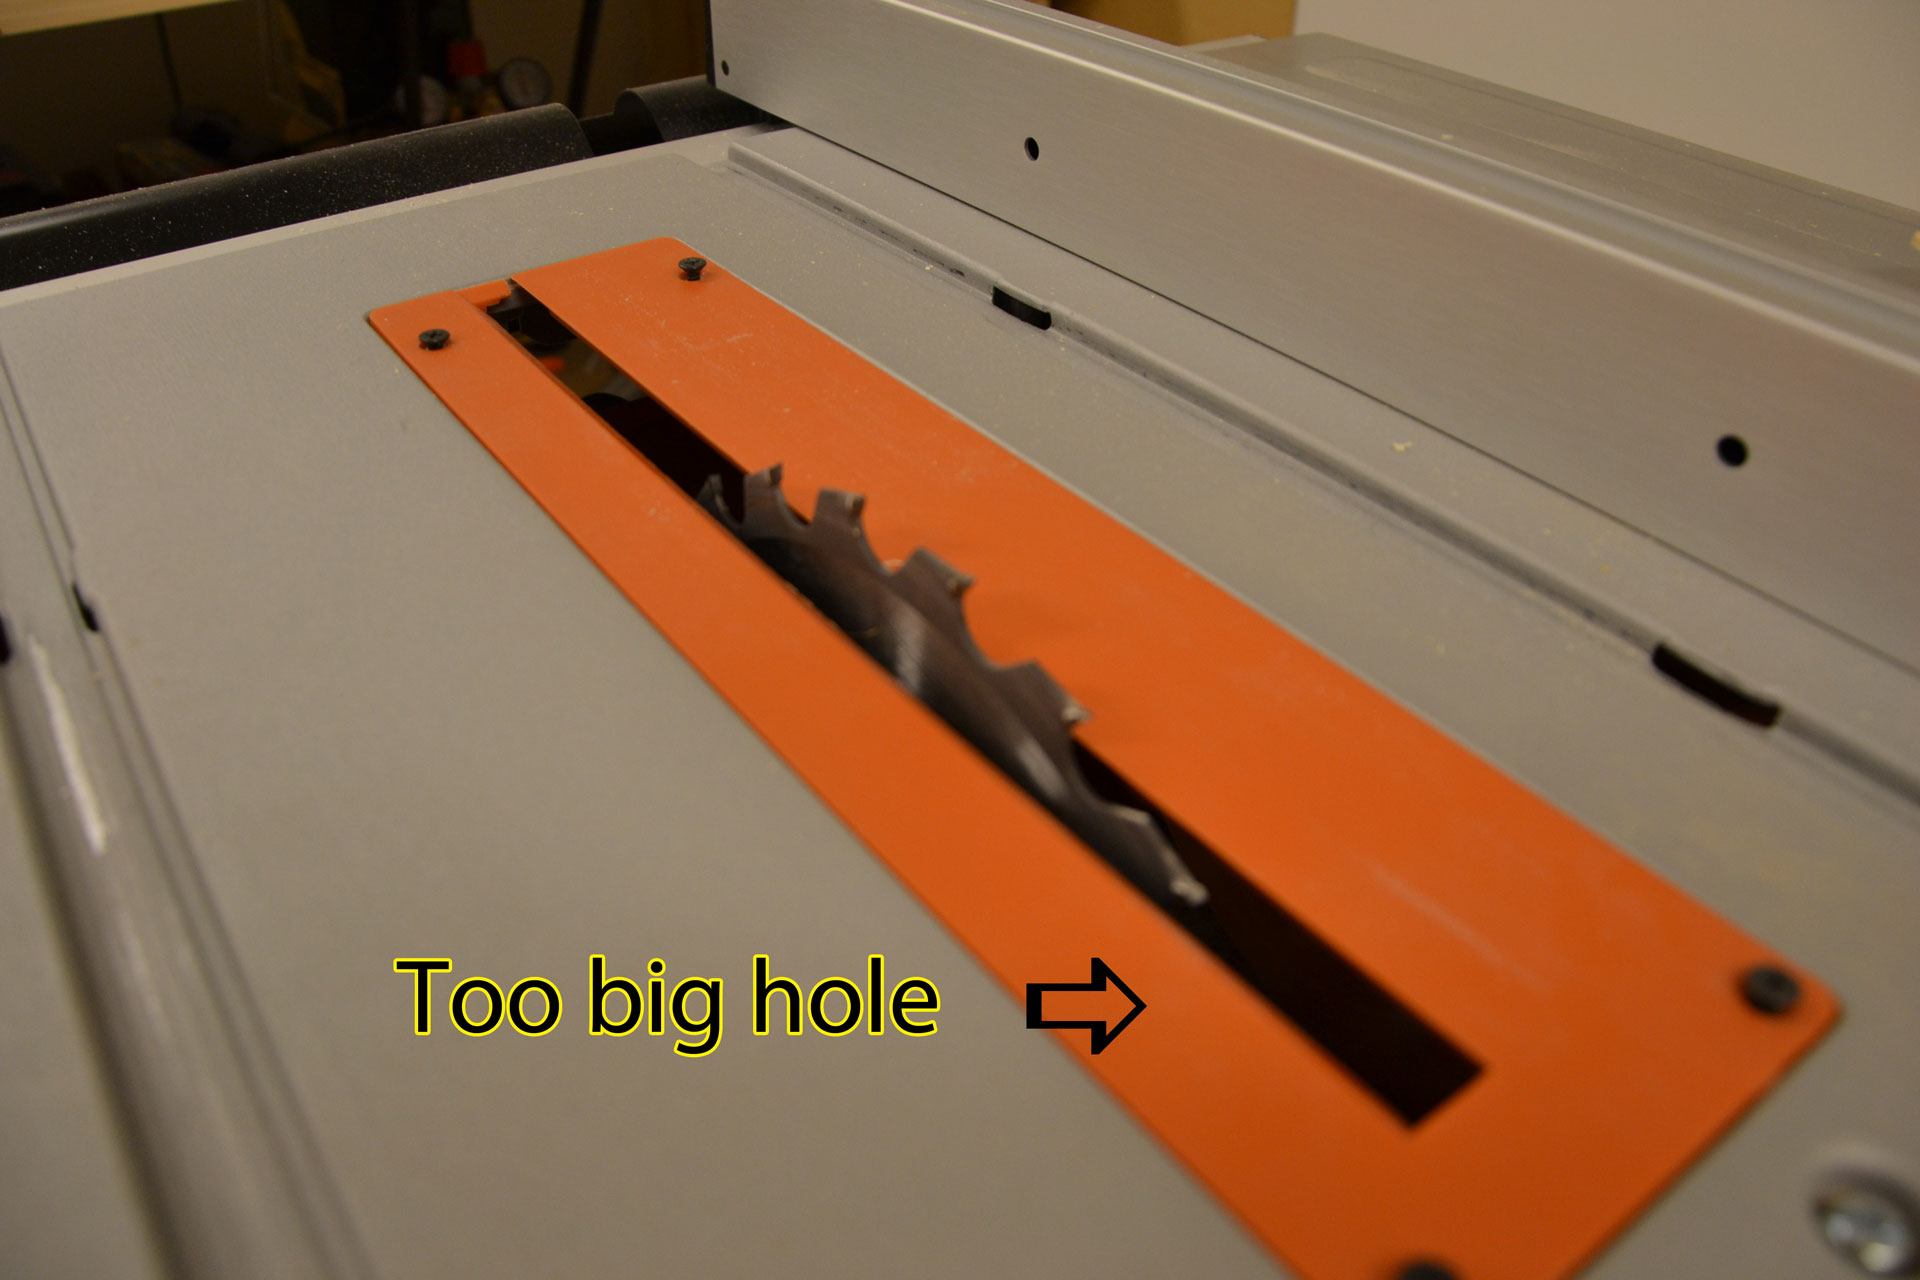
Problem 2 - sloppy, non flat table saw insert
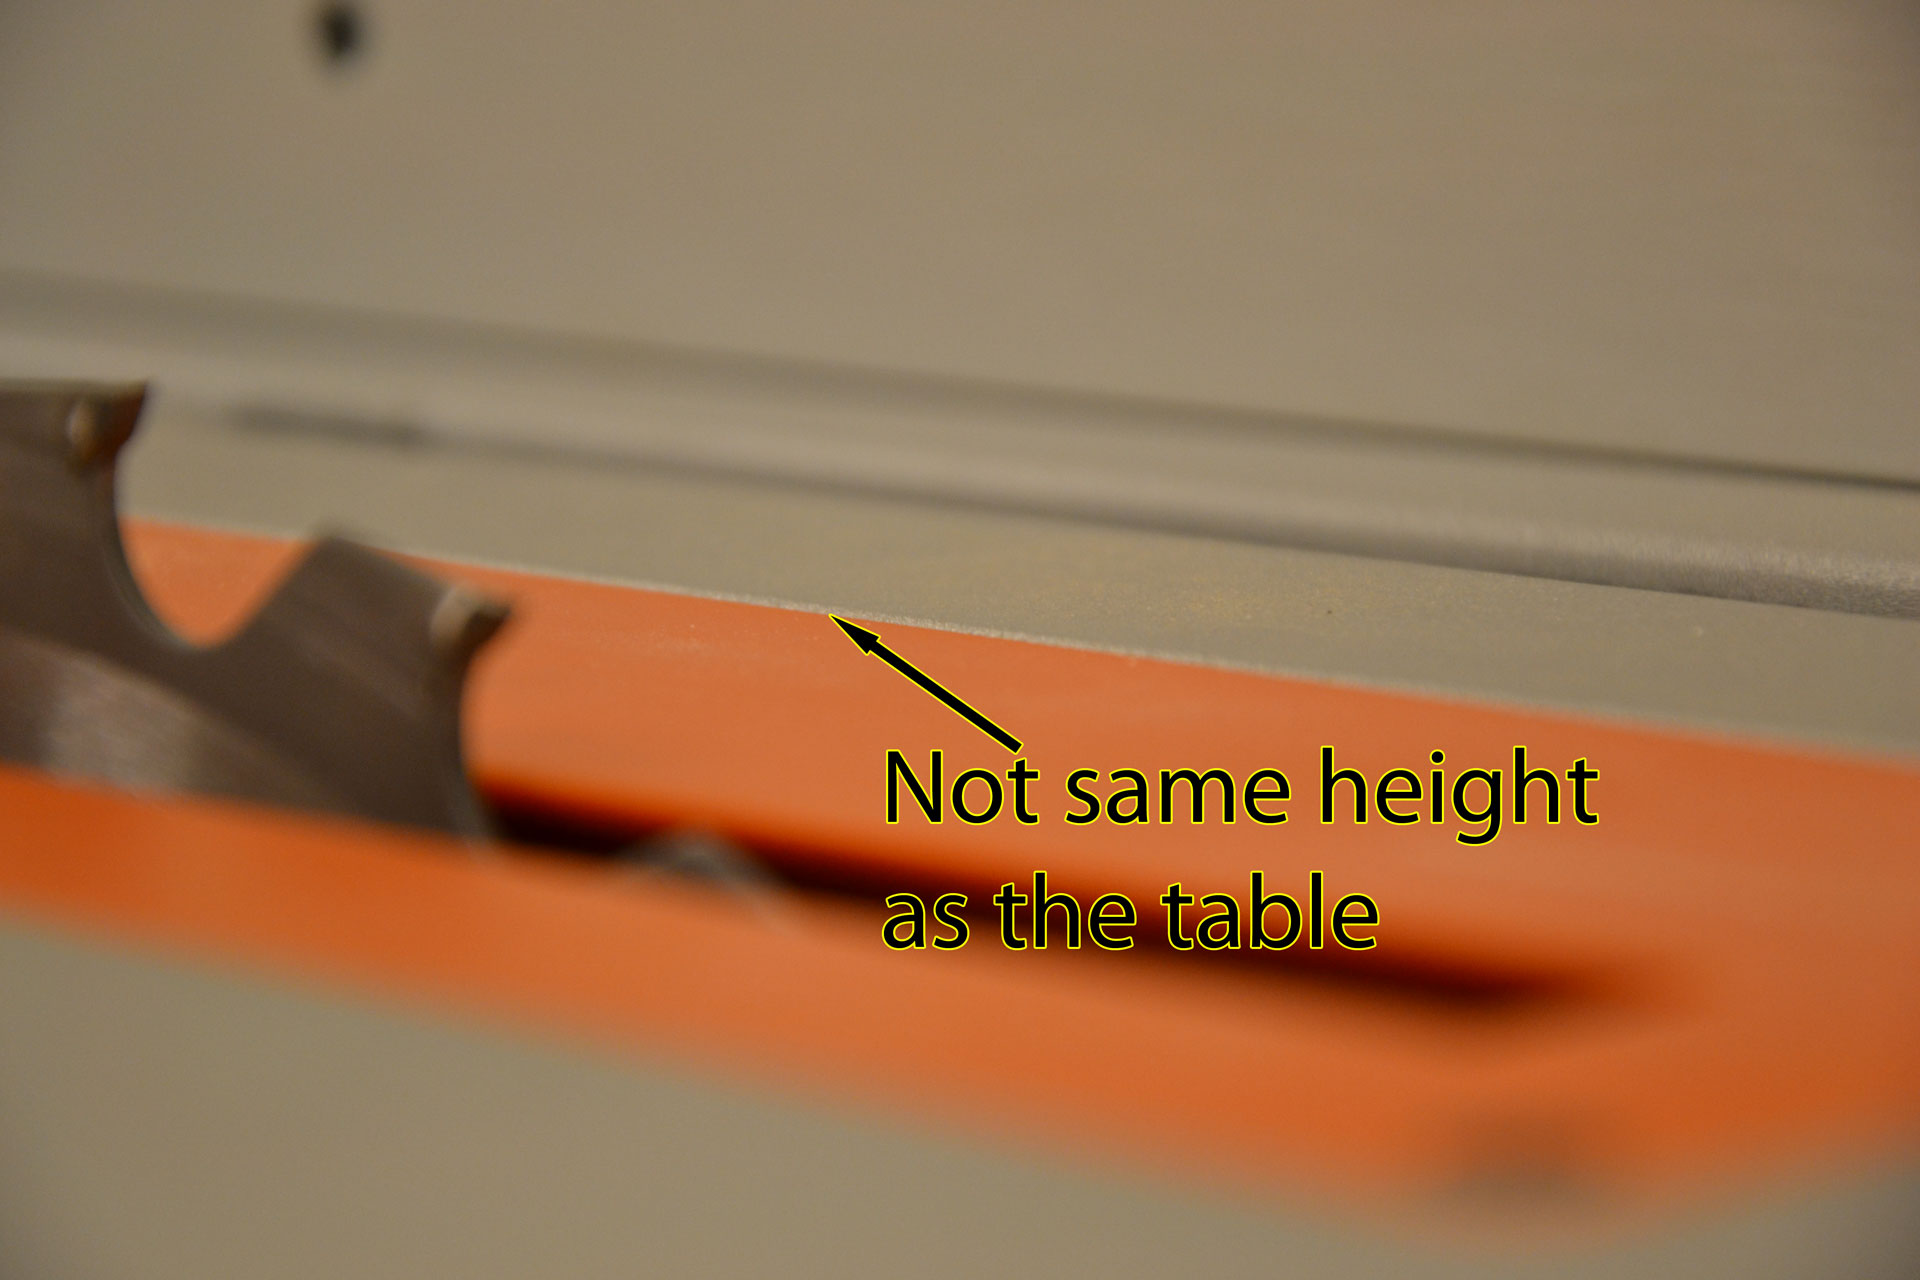
The insert is made out of thin plastic and seems quite fragile. Also it's made so you should be able to do 45 degree cuts without having the blade nudging the insert. This is good ... and bad. It's bad because you cannot cut thin strips, since if you try to do this, they will simply fall down into the table saw in this rather big hole. Another thing with this insert that it's not dead flat with the top of the table saw, which means that thin pieces could tilt a little bit and as an end result you will get non squared cuts.
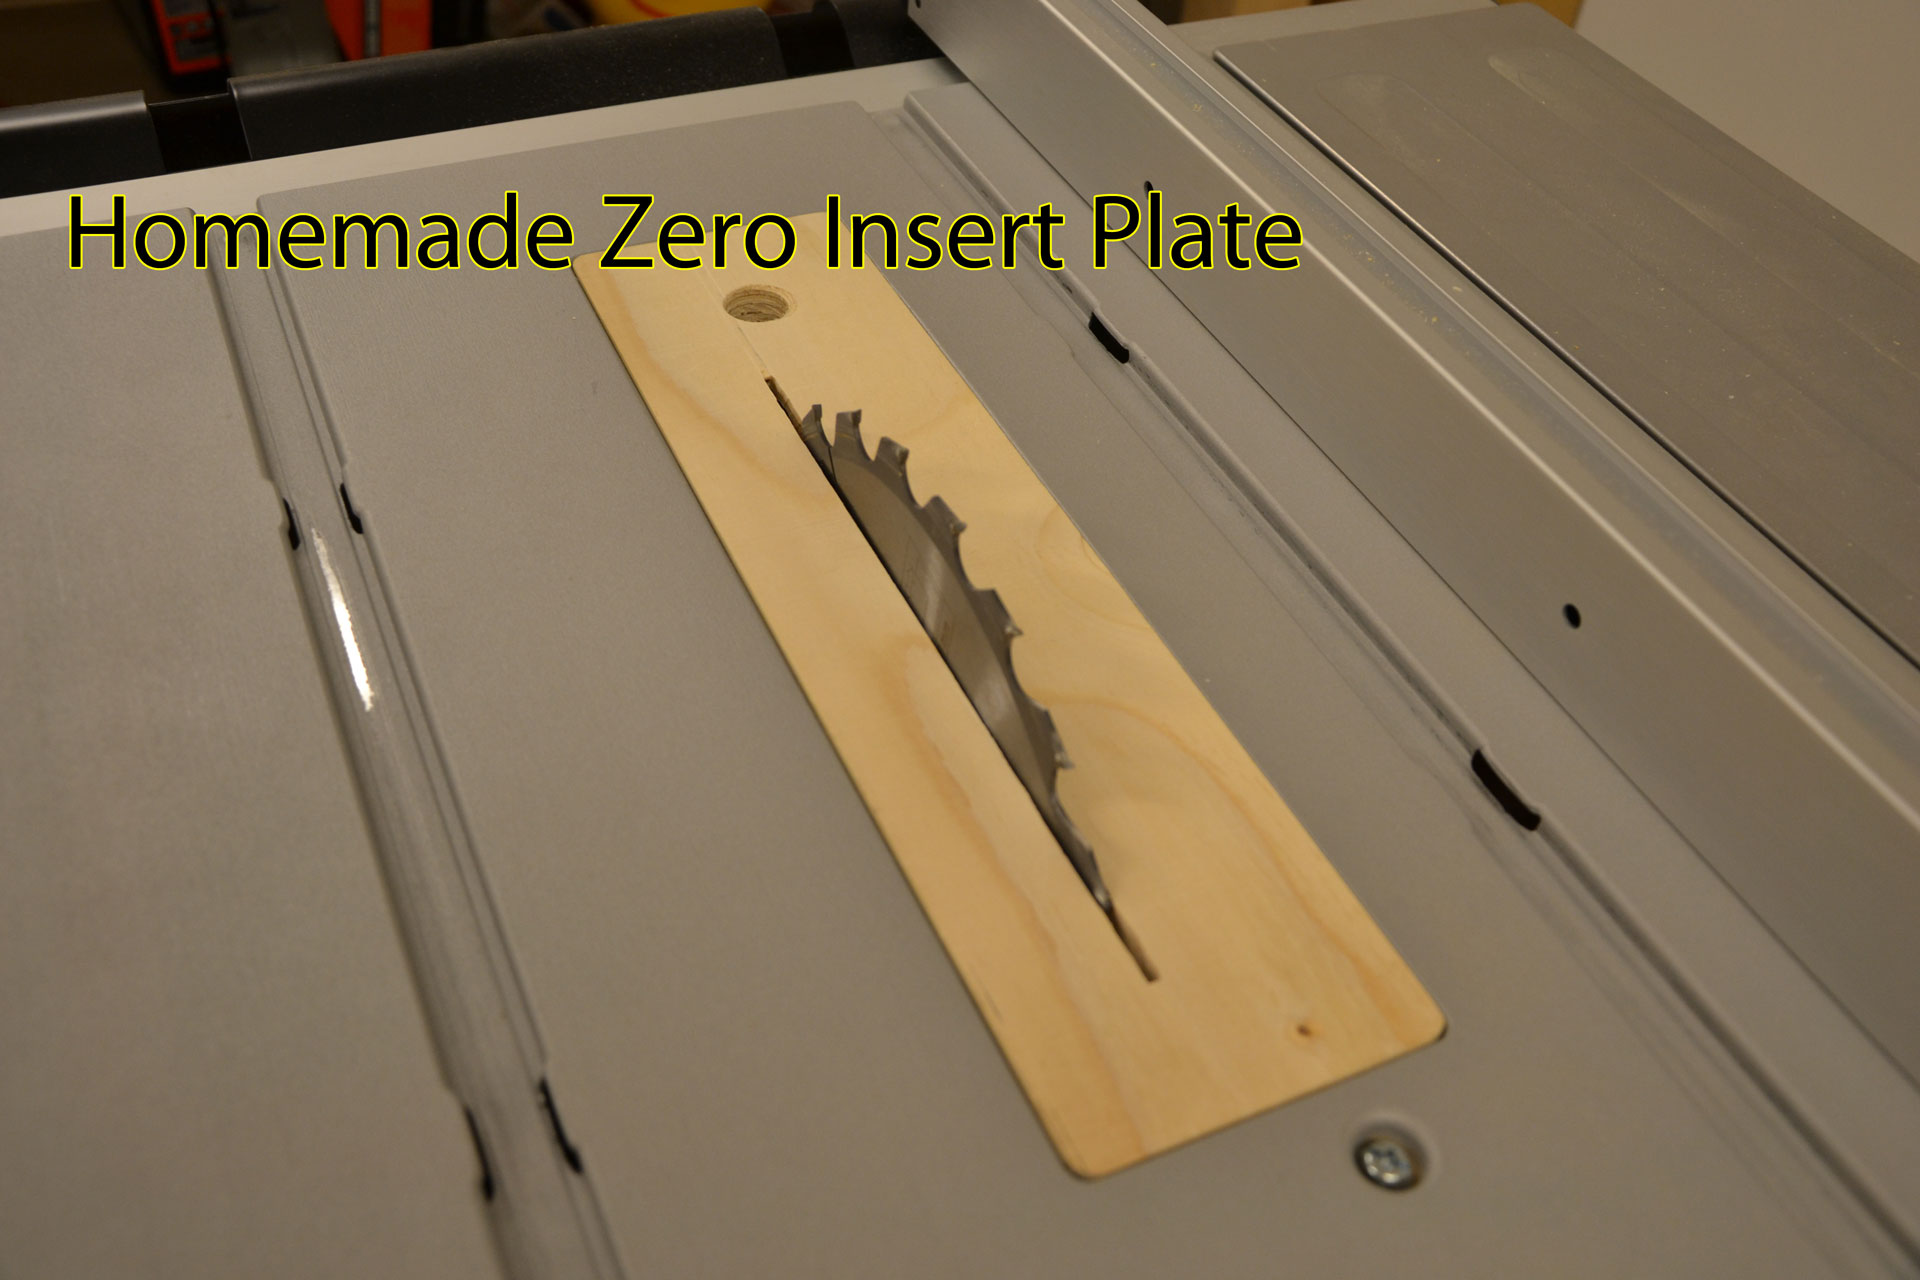
As seen in the image above, my solution to this problem was to simply create a new zero play insert made out of plywood instead. It took an hour or so to make it fit and get the correct height. When that was done I could go back working on my oak sled runners.
Problem 3 - hard to make straight cuts using the fence
I still haven't been able to figure out why I cannot make complete straight cuts. I think it's because of a couple of different reasons. First reason is probably because I'm a beginner, secondly it seems like the table saw fence have some play before tightening it and lastly I'm pretty sure that the blade isn't square to either the slots and/or the fence, more on that later.
Anyhow, I managed to get the strips to a fairly good size and I also managed to
route the tiny "slots" for the inverted t-slots. So far so good.
Mounting the sled runners on the sled base
This is pretty straight forward, put the runners in the slots, put the sled base on top of them and the table saw table. Use some screws and/or glue to put them together. I did that and after doing so I noticed that I barely could move my sled. So, what was wrong? After some investigation I realized that my sled runners was a bit too thick in some areas of the slots. So after some fine tuning and moving the sled back and forth it started to move a little smoother (but still not as good as I wanted it to be).
Side note: Later on when creating another sled I realized that the stupid inverted t-slots are not the same size. Some of them are bigger than others. After some sanding on the inverted t-slots, directly on the aluminium (both the height and the width), to make them more equal, things are suddenly running even more smoothly now.
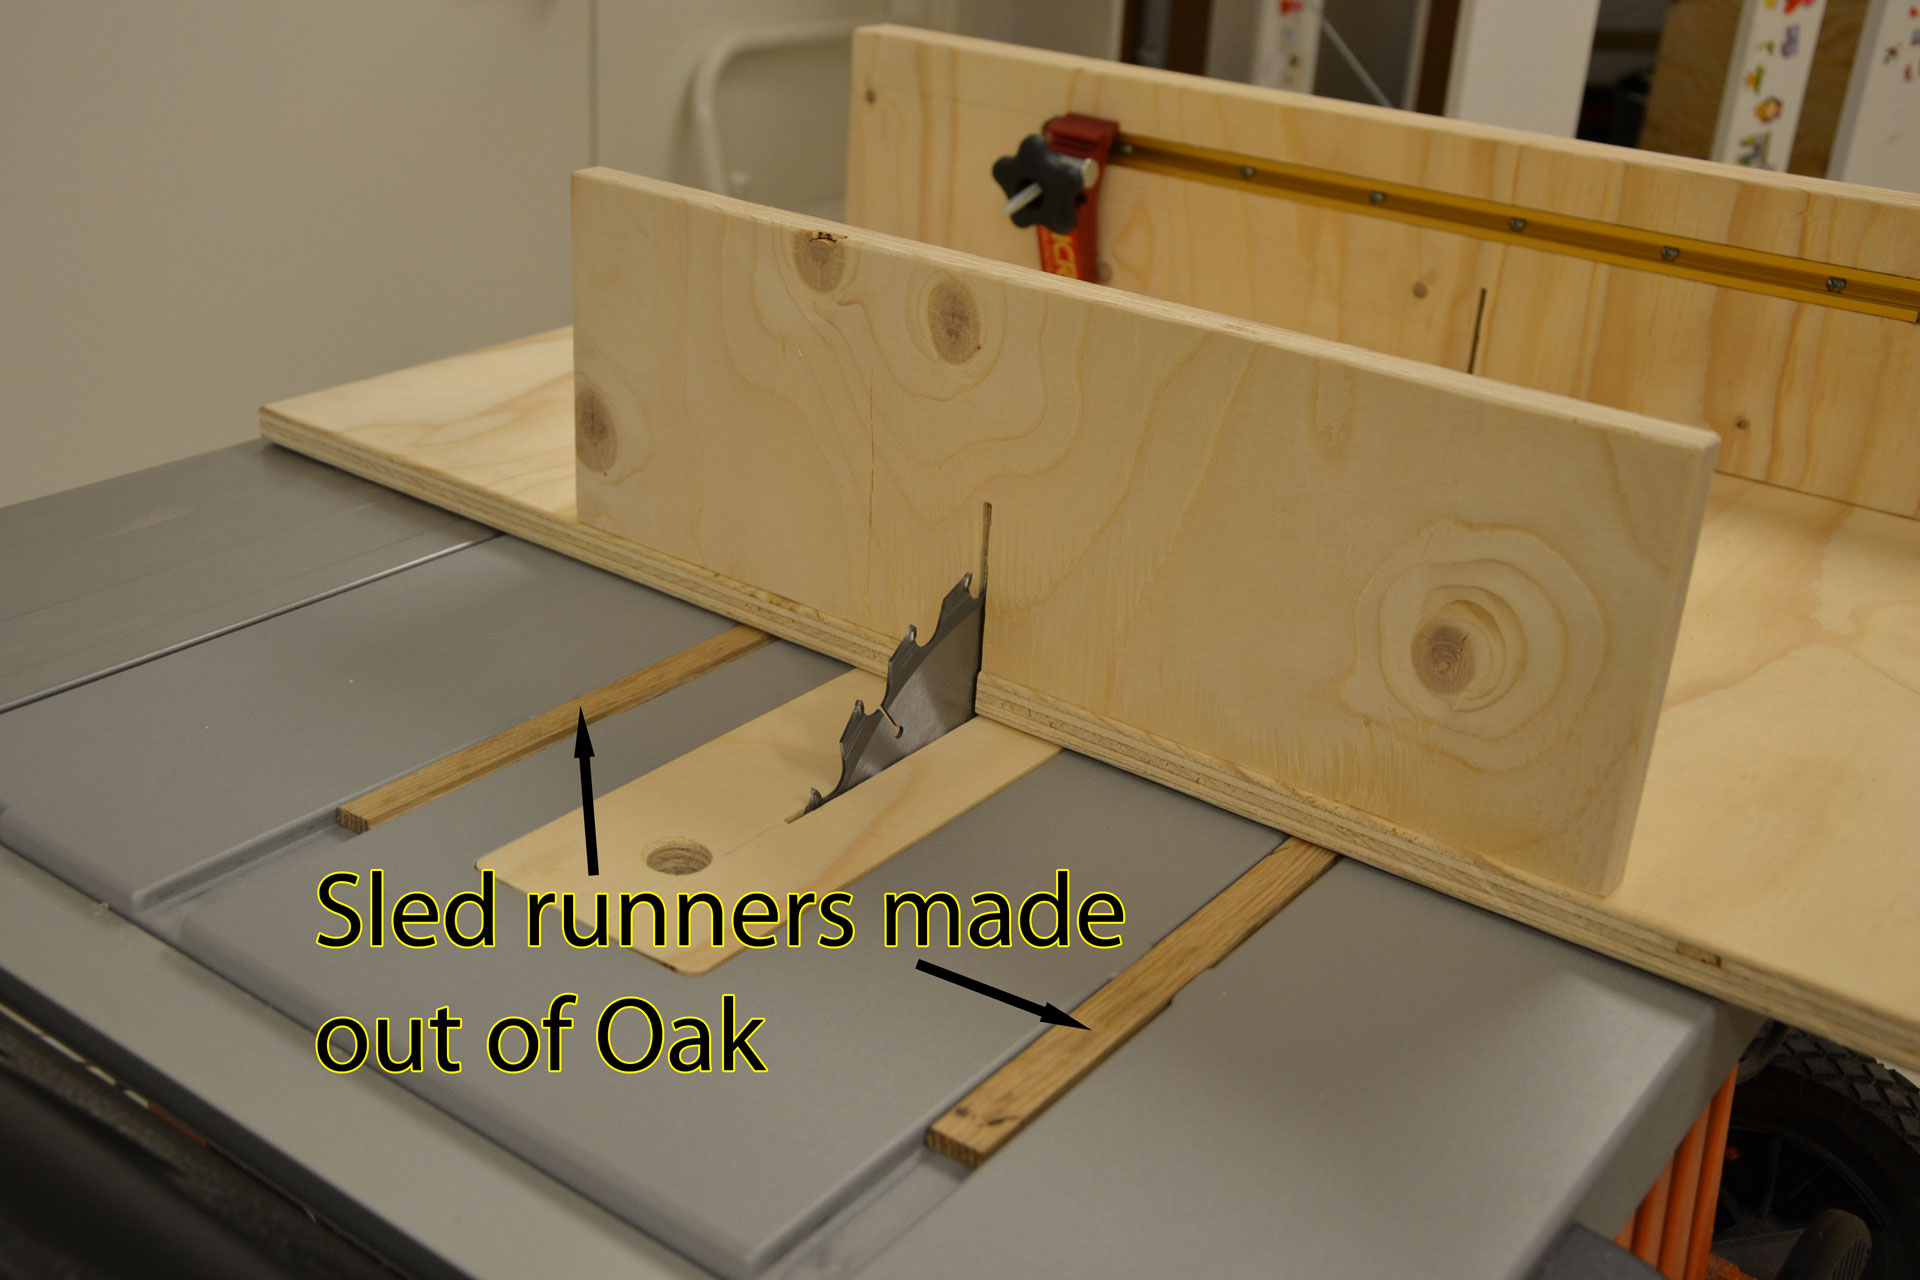
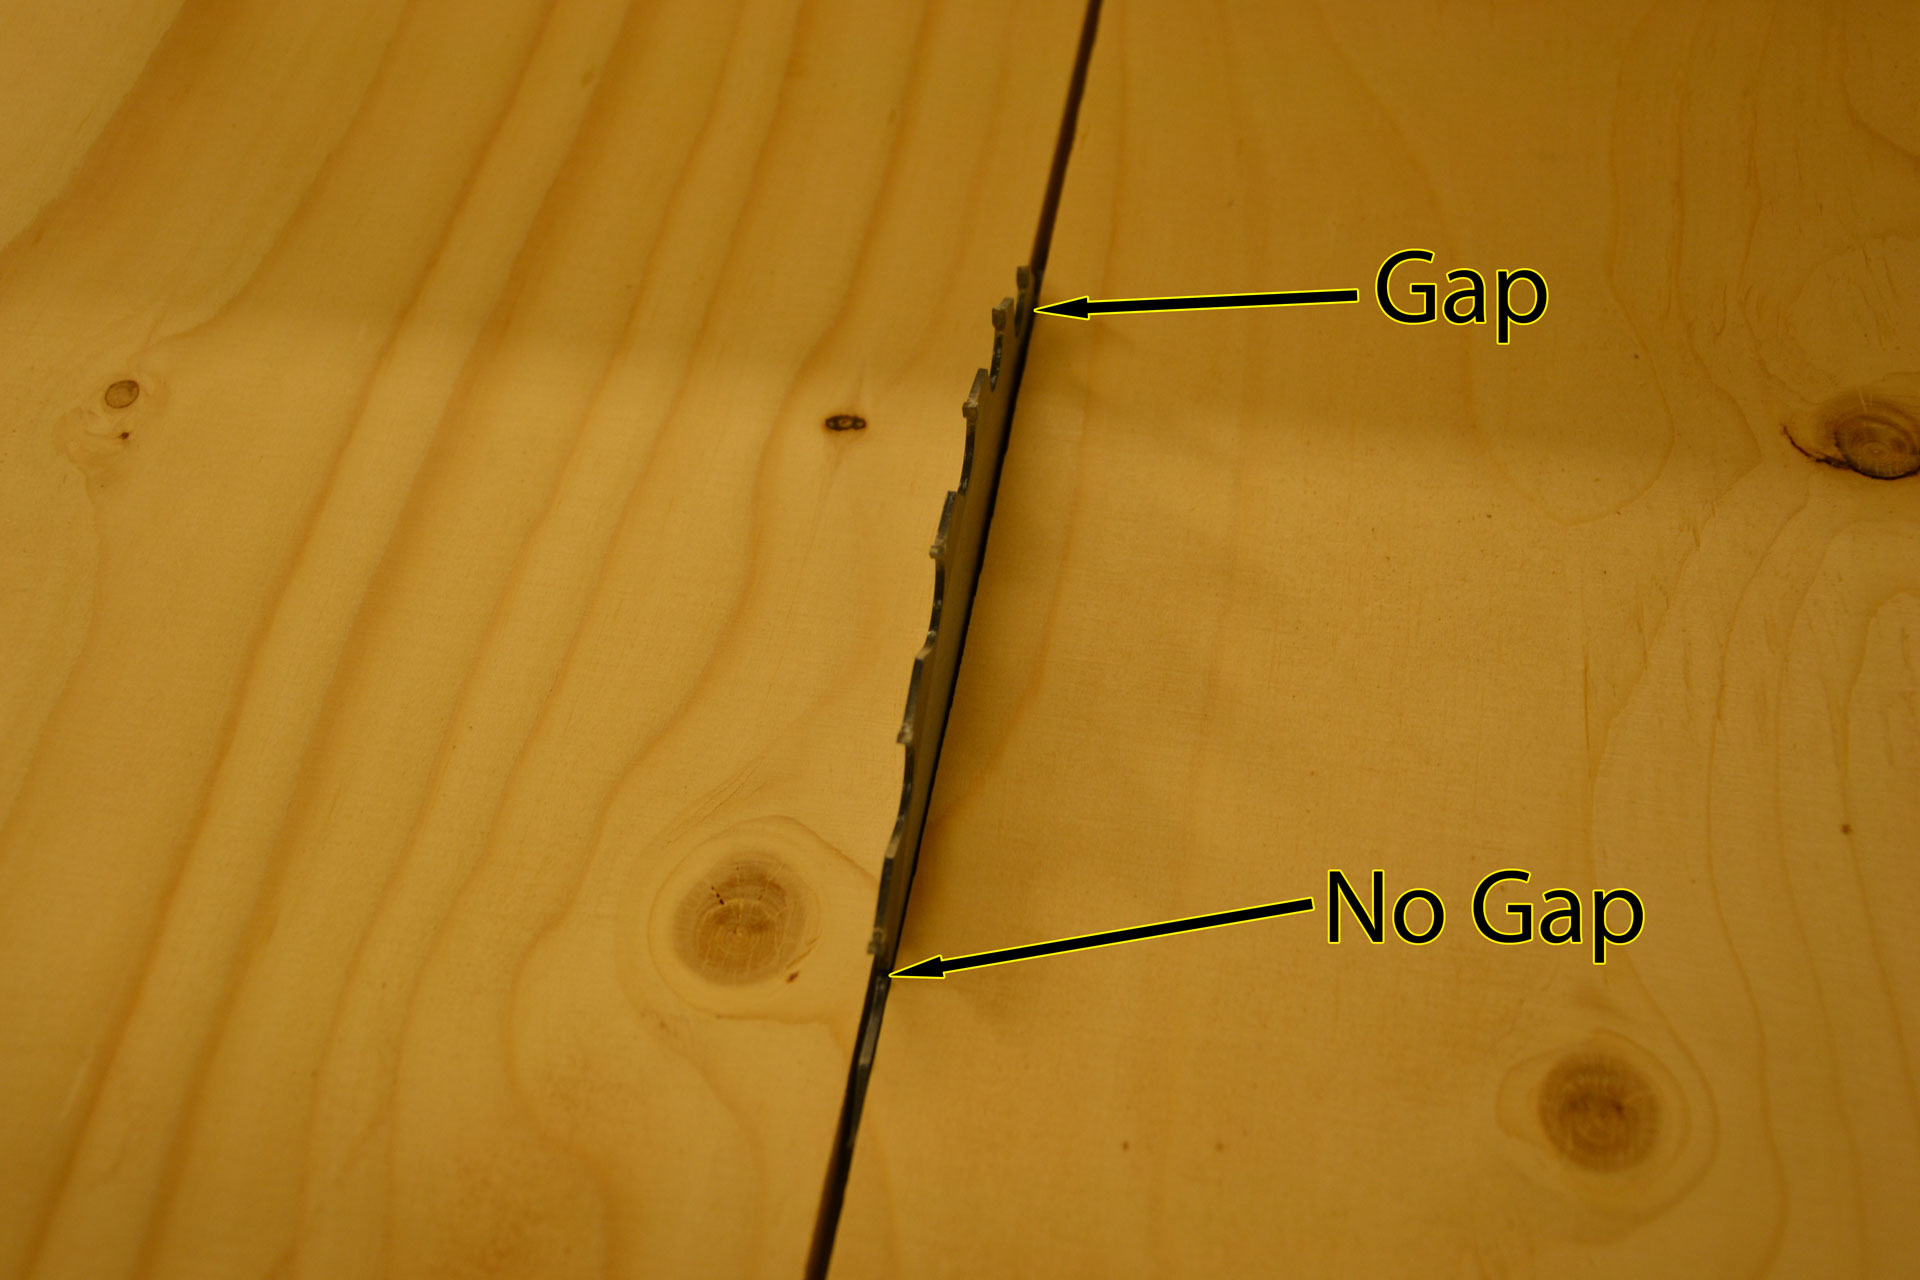
Problem 4 - saw blade and slots are not parallel
The rest of the cross cut sled build was pretty straight forward, just "Google" "how to make a cross cut sled" and you will find several guides of how to do it. I did walk the extra mile and were using the 5 cut method to get the back fence of the sled (almost) perfectly perpendicular to the cut. Note that I'm saying "the cut", because the cut is not perpendicular to the table saw blade (see image below). My take is that the table saw slots are not parallel with the table saw blade. I doesn't really matter when using a cross cut sled, it's just that the cut will be a little bit wider than the kerf of the saw blade. However I would prefer having the sleds parallel.
Other things that a potential buyer has to be aware of
The Table Top
The top of the table is made out of aluminium and the surface is a little bit rough. It's not a big problem, but you have to be aware of that you cannot use magnetic tools like the ones used together with a dial indicator. I also don't think it's very common to have an iron surface on portable table top saws.
The Riving knife
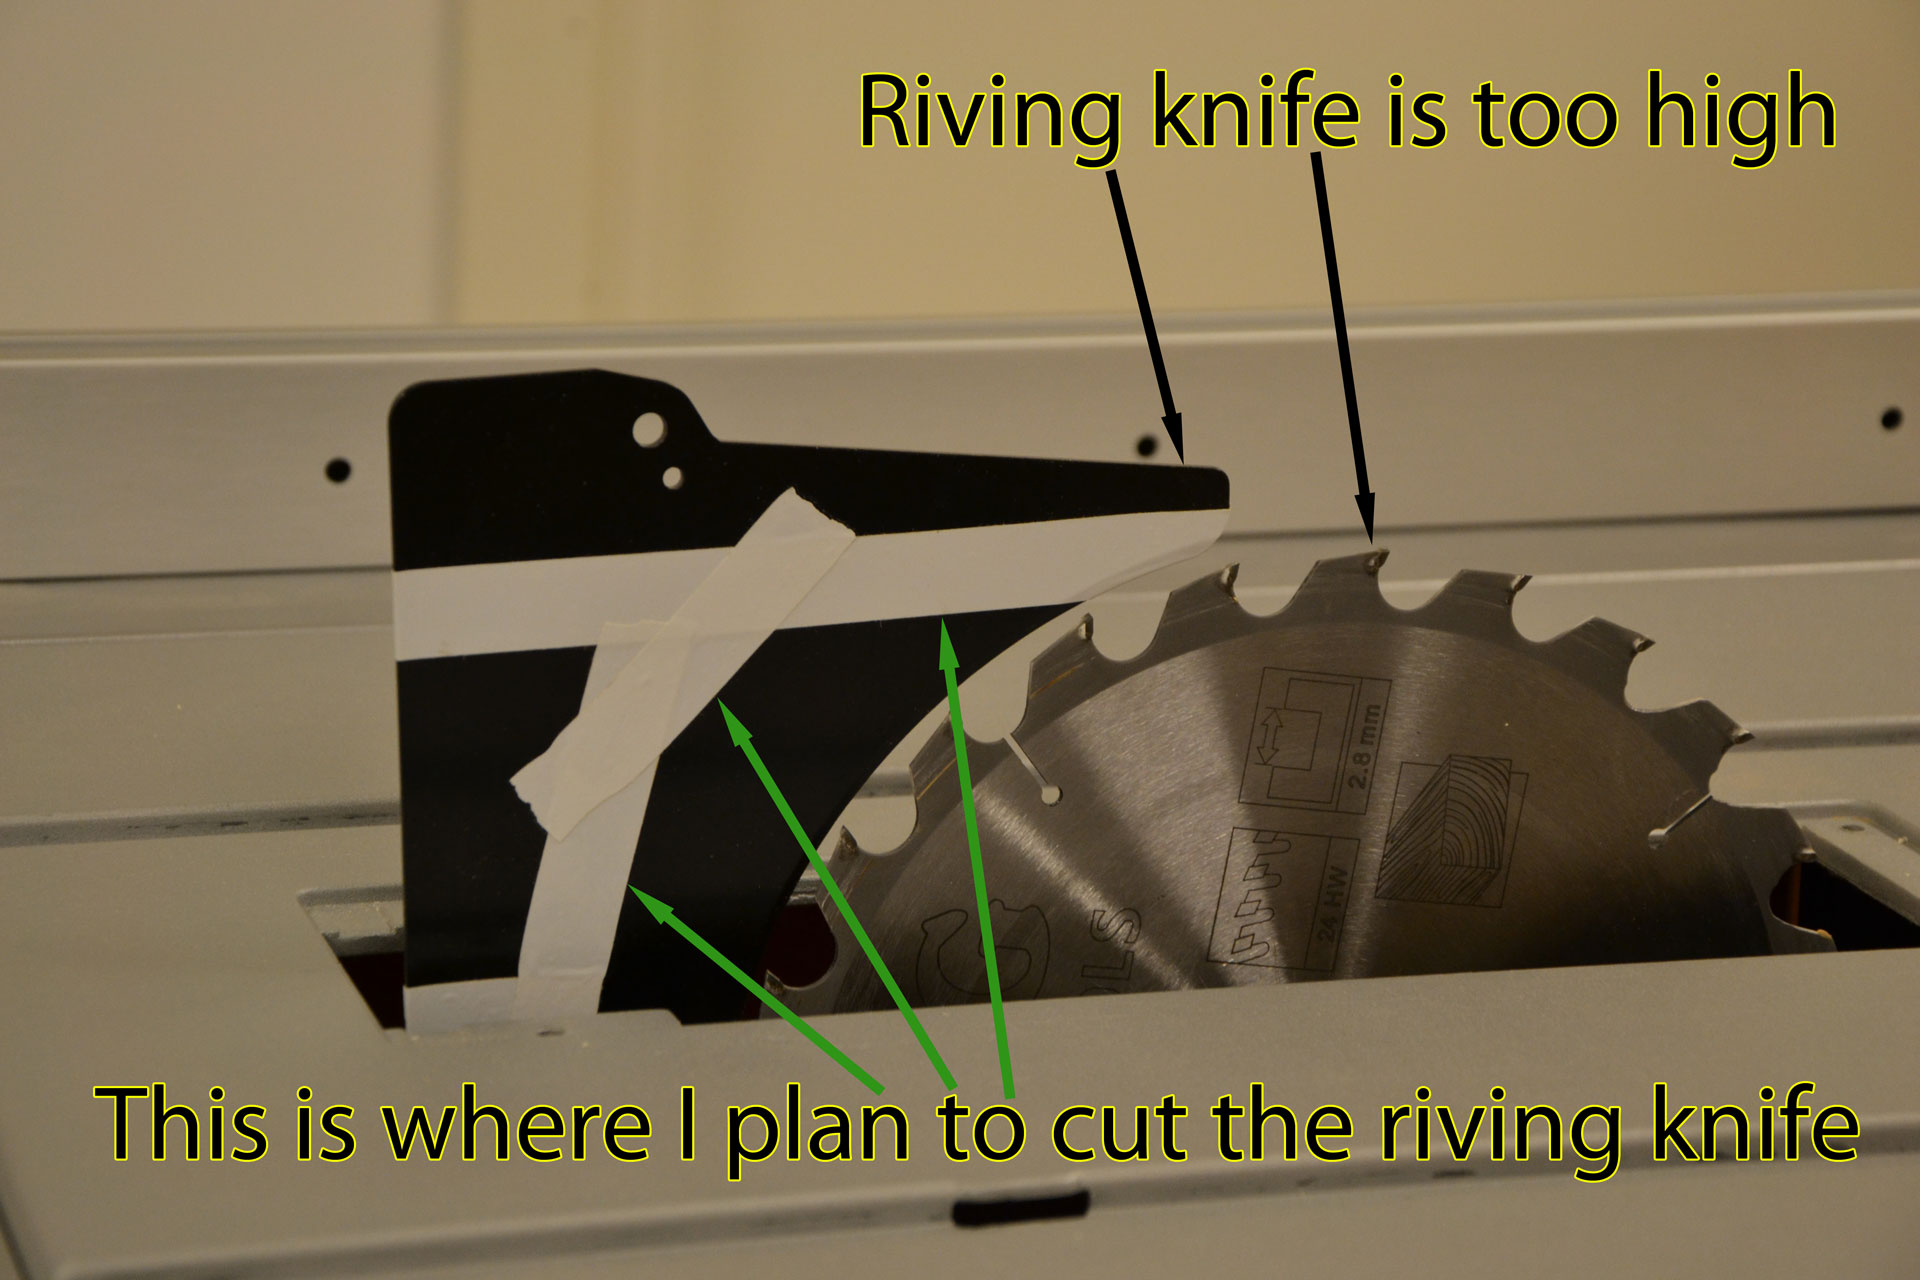
The riving knife is quite big and follows the saw blade when you raise and lower your saw blade. That is really good. The downside is that the riving knife also goes above the saw blade which means that you cannot cut grooves/slots when having the riving knife mounted. You cannot adjust this. Either the riving knife is mounted or it has to be removed. Since I'm really concerned about safety when it comes to using my table saw, my plan is to cut the riving knife so it stays just below the height of the saw blade (see the image above). However by doing so I cannot mount the dust collector / kickback protection again. This is not a big deal for me, since that is to big and bulky anyway and having a riving knife is the critical thing to have mounted to prevent kickback.
The riving knife doesn't come with any quick mount. To remove it you need to first remove the insert and then you need to unscrew the two hex bolts that tightens the riving knife. It would be nice if it had the same type of quick mount that you can find on other table saws.
AEG support
Since I planned to modify my riving knife I wanted to ask AEG if and where I could buy another riving knife, so that I could have one modified riving knife and one that is as when I bought the saw. I think I've tried to contact them 2 or 3 times using the "Contact US" link on table saw page. However without success, I haven't seen any response at all. This is bad AEG!
Summary
Pros
- Rather cheap table saw, I bought it when they had some kind of campaign and without shipping it costed, I think 3995:- SEK which is roughly USD $460 with todays exchange rate. Normally it's a little bit more expensive.
- Well built. It feels sturdy.
- Quite good cutting depth, 90mm for straight cuts and 62mm for 45 degree cuts is quite good.
- Integrated table side extension up to 645 mm.
- Makes quite clean cuts.
- Soft start: Nice to have even though not necessary.
- Foldable stand which is very easy to use.
Cons
- Hard to make perfect straight cuts using the fence.
- The miter gauge slots in the table is a joke. Why the heck didn't they go for standard 3/4" (wide) x 3/8" (deep) miter gauge slots?
- The included miter gauge is just crap.
- Riving knife is too high.
- No quick mount/release of the riving knife. It's mounted using normal hex-bolts.
- The insert is not so well made and this is also a non-standard format, which means that you cannot buy standards inserts, which you otherwise easily can buy from eBay or woodworking shops.
- AEG support doesn't answer when using the "Contact US" page on their site.
Is it worth buying?
If you're a beginner and plan to mainly use it to rip wood and doesn't care too much about accuracy, then I think this is a good table saw. However, if you are more into accuracy and care about micrometer instead of millimeter and if you plan to use various tools attached to the slots, then I'd not recommend you to buy this table saw. It's simply too much hassle to create and or modify existing runners to make them usable. For me it is working now after the tweaks I've done. But if I would have known what I know now I would have looked for another table saw instead, like GTS 10 XC Professional, Dewalt DW744XRS or DEWALT DW745.
I hope this review was useful, in case you have questions, please use the comment field below and I'll try to answer your questions.
EDIT 2016: I've sold this table saw and I did end up buying a Dewalt DW745 instead.
// Joakim